FAQFAQ   SearchSearch   MemberlistMemberlist   UsergroupsUsergroups   RegisterRegister   ProfileProfile   Log in to check your private messagesLog in to check your private messages   Log inLog in 
Photoshop Cs2: Full Signature Tutorial - Made by Tramposch

 
Post new topic   Reply to topic    Bloodfist [SoD]'s Board Forum Index -> Tutoriale
View previous topic :: View next topic  
Author Message
Bloodfist
Forum Guardian
Forum Guardian
Bloodfist

Joined: 26 Oct 2007
Posts: 758
Location: Underworld

PostPosted: 21/12/2007 16:15    Post subject: Photoshop Cs2: Full Signature Tutorial - Made by Tramposch Reply with quote

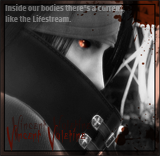
This is a tutorial on how to make a signature like this:

Photoshop Cs2: Full Signature Tutorial - Made by Tramposch Photoshop Cs2: Full Signature Tutorial - Made by Tramposch

First of all, you need to find your render, try to find one that doesn't have a lot of space around its arms, or doesnt have a cape, because

then it will not looks so great with empty space.

For the signature I used this render:

http://i97.photobucket.com/albums/l217/Tra...oredcore2er.png

1) Open a new document, with a white background, any reasonable signature size will do (don't make it too large ;-) )

2) Go Edit---> Fill (shift + F5, or set black as foreground ( I think) and click control shift backspace)

3) Duplicate that layer, so now you have two negru layers:

Photoshop Cs2: Full Signature Tutorial - Made by Tramposch Photoshop Cs2: Full Signature Tutorial - Made by Tramposch

When you have done that, then you go to filter --> Render ---> Lens Flare set on these settings: (make sure that you put the lense flare under

where your render is going to be located).

Photoshop Cs2: Full Signature Tutorial - Made by Tramposch Photoshop Cs2: Full Signature Tutorial - Made by Tramposch

4)Then to make it look better, erease the part that is next to the actuall part that is bright. (circled in image below, and make sure that you

did the lense flare on top black layer)

Photoshop Cs2: Full Signature Tutorial - Made by Tramposch Photoshop Cs2: Full Signature Tutorial - Made by Tramposch

5)After that, you can open up your render, again, here is the render I used:

http://i97.photobucket.com/albums/l217/Tra...oredcore2er.png

and place it on the right side (you can choose wherever you want, but make sure that the lense flare is under the render).
Resize the render to the size you want, or leave it if nescesery. Then duplicate the layer (Control J) and click the little eye next to the

layer in the layer pallete.

6)I am not the GREATEST at smudging, but I am not horrible, let me show you how the outcome should be (does not matter what brush you use, and

you might want to smudge a bit more then shown :-) ):


Photoshop Cs2: Full Signature Tutorial - Made by Tramposch Photoshop Cs2: Full Signature Tutorial - Made by Tramposch

7)Set that layer on colour burn, colour dodge, or overlay, whatever setting suites it the best. Then duplicate the layer, then put it on colour

burn, colour dodge, or overlay, whatever setting suites it the best, but make sure it is not to dark, it should look like this after:

Photoshop Cs2: Full Signature Tutorial - Made by Tramposch Photoshop Cs2: Full Signature Tutorial - Made by Tramposch

8) Once you have done that, un-hide the hidden render (click on the little eye again).

9) (you can choose if you include/exclude this step from the signature) duplicate the render again, and then set it on hue, then the next one

on soft light, or a setting that suites it... (you prolly shouldnt do this ;-) )

10)Mkay when you are done that, create a new layer (control shift n) and take out your pencil tool at a 1 pixel thickness, colour white. Then

trace your render with it, then set that layer on overlay, if you want, you can produse a new layer again, scribble a bit over the render, then

lower the opacity, and set it on overlay, so it looks a bit..... well, how do I explain it.. Cool? Lol. Your outcome should look like this:

Photoshop Cs2: Full Signature Tutorial - Made by Tramposch Photoshop Cs2: Full Signature Tutorial - Made by Tramposch

11) Ok, next step you create a new layer, on top of all layers (control shift N), go to image --> apply image and set it to this:

Photoshop Cs2: Full Signature Tutorial - Made by Tramposch Photoshop Cs2: Full Signature Tutorial - Made by Tramposch

12) To the layer you just completed by applying that image, you need to follow this tutorial: ( I made, it is short)

http://www.trap17.com/forums/photoshop-mos...ect-t48223.html

13) You may have to remove some steps on that tutorial, or not, you just need to make that tile effect, and that is it. Once you made that,

erease all the tiles on the render, and then lower the opacity of your eraser, and erase the rest of the part, so it isnt as.... as.. intense..

14) Next :-) you can create your border!
Mkay, im not sure if this will confuse you or not, but i will try to explain it the best i can.

Click the letter U, it should hilight a tool that is nine tools down from the top, in the right collumn. Right click that tool, then select

rounded rectangle tool.
Set the tool on these settings:

Photoshop Cs2: Full Signature Tutorial - Made by Tramposch Photoshop Cs2: Full Signature Tutorial - Made by Tramposch

once you select that, click the top left of your signature with it, and hold the mouse down (dont do it at the top left corner! go more right

so you cut some of the ugly junk on the left side off) and then drag down, all the way down to the bottom of the signature, then drag to the

right, and drag the curves of the right side over the sig, so that side will be square. here is an image on how it should look:

Photoshop Cs2: Full Signature Tutorial - Made by Tramposch Photoshop Cs2: Full Signature Tutorial - Made by Tramposch

Take pen tool, right click that circle thing you put, and click make selection, then copy it into a new document with a transpaernt background

15) copy that into a new document, and select the outer border of the image (make sure background is transparent!) and click stroke, set it on

these settings: (on a new layer)

Photoshop Cs2: Full Signature Tutorial - Made by Tramposch Photoshop Cs2: Full Signature Tutorial - Made by Tramposch

hen set that layer to overlay, add your text, and voila! here is a complete version of the signature:

Photoshop Cs2: Full Signature Tutorial - Made by Tramposch Photoshop Cs2: Full Signature Tutorial - Made by Tramposch
_________________
<center>Photoshop Cs2: Full Signature Tutorial - Made by Tramposch Photoshop Cs2: Full Signature Tutorial - Made by Tramposch
Photoshop Cs2: Full Signature Tutorial - Made by Tramposch Photoshop Cs2: Full Signature Tutorial - Made by Tramposch
Photoshop Cs2: Full Signature Tutorial - Made by Tramposch Photoshop Cs2: Full Signature Tutorial - Made by Tramposch</center>
Back to top
View user's profile Send private message
Display posts from previous:   
Post new topic   Reply to topic    Bloodfist [SoD]'s Board Forum Index -> Tutoriale All times are GMT + 2 Hours
Page 1 of 1

 
Jump to:  
You cannot post new topics in this forum
You cannot reply to topics in this forum
You cannot edit your posts in this forum
You cannot delete your posts in this forum
You cannot vote in polls in this forum


Powered by phpBB © 2001, 2002 phpBB Group
Fa-ti si tu propriul forum GRATUIT, pe www.myforum.ro